Showing posts with label C#. Show all posts

Saturday, 12 March 2022

Write to Azure Blob Storage with Serilog in .NET Core

Similar to the previous post https://jaryl-lan.blogspot.com/2022/03/write-to-elasticsearch-with-serilog-in.html. Will be using Serilog library to write to Azure Blob Storage. Before we can start, you are required to have a Azure Storage Account up and running. Do not worry if you do not have an Azure account as you can actually run the emulator on your local machine. If you have Visual Studio 2022 installed on your machine, then Azurite (To replace Azure Storage Emulator) is included. Otherwise you will have to manually install it.

For those who has Visual Studio 2022. It is located at the following directory

Enterprise:
C:\Program Files\Microsoft Visual Studio\2022\Enterprise\Common7\IDE\Extensions\Microsoft\Azure Storage Emulator

Professional:
C:\Program Files\Microsoft Visual Studio\2022\Professional\Common7\IDE\Extensions\Microsoft\Azure Storage Emulator
For those does not have Visual Studio 2022 installed. 1 alternative is to run it with docker. You may be wondering on the ports defined. Port 10000 is for blob service, 10001 is for queue service and lastly 10002 is for table service.
Pull the azurite image:
docker pull mcr.microsoft.com/azure-storage/azurite

Run the azurite:
docker run --rm -p 10000:10000 -p 10001:10001 -p 10002:10002 mcr.microsoft.com/azure-storage/azurite

Other than the Azurite, you are required to install Microsoft Azure Storage Explorer to browse the logs written into the blob storage.

Back to the code, make sure the following 2 NuGet packages is included.
  • Serilog.AspNetCore
  • Serilog.Sinks.AzureBlobStorage
  • You may use 1 of the following methods to be implemented into your Program.cs file.

    Method 1: Configure Serilog in code.

    [.NET 6] - Minimal hosting model
    builder.Host.UseSerilog((hostBuilderContext, loggerConfiguration) =>
        loggerConfiguration
            .WriteTo.Console()
            .WriteTo.AzureBlobStorage(
                "DefaultEndpointsProtocol=http;AccountName=devstoreaccount1;AccountKey=Eby8vdM02xNOcqFlqUwJPLlmEtlCDXJ1OUzFT50uSRZ6IFsuFq2UVErCz4I6tq/K1SZFPTOtr/KBHBeksoGMGw==;BlobEndpoint=http://127.0.0.1:10000/devstoreaccount1;",
                Serilog.Events.LogEventLevel.Information,
                storageContainerName: "writetoazureblobstoragewithserilog",
                storageFileName: "WriteToAzureBlobStorageWithSerilog-{yyyy}-{MM}-{dd}.txt"));
    SelfLog.Enable(Console.Error);

    [.NET 5 and earlier]
    Host.CreateDefaultBuilder(args)
        .UseSerilog((hostBuilderContext, loggerConfiguration) => {
            loggerConfiguration
            .WriteTo.Console()
            .WriteTo.AzureBlobStorage(
                "DefaultEndpointsProtocol=http;AccountName=devstoreaccount1;AccountKey=Eby8vdM02xNOcqFlqUwJPLlmEtlCDXJ1OUzFT50uSRZ6IFsuFq2UVErCz4I6tq/K1SZFPTOtr/KBHBeksoGMGw==;BlobEndpoint=http://127.0.0.1:10000/devstoreaccount1;",
                Serilog.Events.LogEventLevel.Information,
                storageContainerName: "writetoazureblobstoragewithserilog",
                storageFileName: "WriteToAzureBlobStorageWithSerilog-{yyyy}-{MM}-{dd}.txt");
            SelfLog.Enable(Console.Error);
        })
        .ConfigureWebHostDefaults(webBuilder =>
        {
            webBuilder.UseStartup<Startup>();
        });

    Method 2: Configure Serilog from appSettings file.

    [appSettings.json]
    "Serilog": {
      "WriteTo": [
        {
          "Name": "Console"
        },
        {
          "Name": "AzureBlobStorage",
          "Args": {
            "ConnectionString": "DefaultEndpointsProtocol=http;AccountName=devstoreaccount1;AccountKey=Eby8vdM02xNOcqFlqUwJPLlmEtlCDXJ1OUzFT50uSRZ6IFsuFq2UVErCz4I6tq/K1SZFPTOtr/KBHBeksoGMGw==;BlobEndpoint=http://127.0.0.1:10000/devstoreaccount1;",
            "storageContainerName": "writetoazureblobstoragewithserilog",
            "storageFileName": "WriteToAzureBlobStorageWithSerilog-{yyyy}-{MM}-{dd}.txt"
          }
        }
      ]
    }

    [.NET 6] - Minimal hosting model
    builder.Host.UseSerilog((hostBuilderContext, loggerConfiguration) =>
        loggerConfiguration
            .ReadFrom.Configuration(hostBuilderContext.Configuration));
    SelfLog.Enable(Console.Error);

    [.NET 5 and earlier]
    Host.CreateDefaultBuilder(args)
        .UseSerilog((hostBuilderContext, loggerConfiguration) =>
        {
            loggerConfiguration
                .ReadFrom.Configuration(hostBuilderContext.Configuration);
            SelfLog.Enable(Console.Error);
        })

    Microsoft Azure Storage Explorer

    For more details on the setup and the ConnectionString, do refer this link https://docs.microsoft.com/en-us/azure/storage/common/storage-use-azurite?tabs=visual-studio


    Sunday, 27 February 2022

    Write to Physical File with Serilog in .NET Core

    It is common for a need to log application errors or including trace log for ease of troubleshooting issues that may arise. By default, the .NET itself already provided a few classes (For example: FileStream, TextWriter, etc) that allows you to write content into file. But what if you want to include logs that are written by the .NET itself, or customize the .NET log content, or write the same content to many different destination (eg: File, ElasticSearch, BlogStorage, etc). Then Serilog can help you with it.

    For the prerequisites, it is required to NuGet the following 2 packages

    • Serilog.AspNetCore
    • Serilog.Sinks.File

    Next, head to Program.cs file. You will need to call to the extension method UseSerilog() to start using Serilog.

    Method 1: Configure Serilog in code.

    [.NET 6] - Minimal hosting model
    builder.Host.UseSerilog((hostBuilderContext, loggerConfiguration) =>
        loggerConfiguration
            .WriteTo.Console()
            .WriteTo.File("logs/log.txt", rollingInterval: RollingInterval.Day));

    [.NET 5 and earlier]
    Host.CreateDefaultBuilder(args)
        .UseSerilog((hostBuilderContext, loggerConfiguration) =>
            loggerConfiguration
                .WriteTo.Console()
                .WriteTo.File("logs/log.txt", rollingInterval: RollingInterval.Day))

    Method 2: Configure Serilog from appSettings file.

    [appSettings.json]
    "Serilog": {
      "WriteTo": [
        {
          "Name": "Console"
        },
        {
          "Name": "File",
          "Args": {
            "path": "logs/log.txt",
            "rollingInterval": "Day"
          }
        }
      ]
    }

    [.NET 6] - Minimal hosting model
    builder.Host.UseSerilog((hostBuilderContext, loggerConfiguration) =>
        loggerConfiguration
            .ReadFrom.Configuration(hostBuilderContext.Configuration));

    [.NET 5 and earlier]
    Host.CreateDefaultBuilder(args)
        .UseSerilog((hostBuilderContext, loggerConfiguration) =>
            loggerConfiguration
                .ReadFrom.Configuration(hostBuilderContext.Configuration))

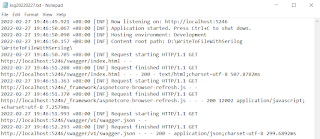
    What the above code snippet does is to write the same log content into console and log file. 

    Write to console

    Write to file

    Based on the specified path value, the file format will be log{yyyyMMdd}.txt (example: log20220227.txt). And since the configuration mentioned the rolling interval is Day, everyday a new file will be created whenever there are new content to be logged. For more details on what can be further customized for the file, you can head over to https://github.com/serilog/serilog-sinks-file.

    You may be wondering what is the difference of the above code snippet compared to creating a new instance of logger with CreateLogger(). First would be to include .NET logs into the file. Second, you will be able to rely on the Microsoft logging library (Microsoft.Extensions.Logging) and inject the instance of ILogger to any of your class through the constructor. Any logs written through the ILogger will be written into your file as well as the console output.

    Sample Code: https://1drv.ms/u/s!Aj2AA7hoIWHm1G4BIALQnYew9KFY?e=bIa0tq

    Saturday, 26 February 2022

    Multi Target Framework for .NET Core Application

    It is possible to target multiple framework for .NET Core application. But it have some limitations. For example, if the project target netcoreapp3.1 and net6.0, features that are available on net6.0 will not longer be supported. Due to this, it is rarely to do so unless you got hit with situation where you want to upgrade to newest .NET version but due to certain servers yet to installed the latest .NET core runtime.

    First and foremost, make sure you have the targeted framework installed. Otherwise you get hit with an error while compiling your code. For example, if you are targeting netcoreapp3.1 and net6.0, make sure both of them is installed on your machine.

    To get started, open up your project by double clicking on it and look for TargetFramework. Rename it to TargetFrameworks and specify net6.0;netcoreapp3.1

    <TargetFrameworks>net6.0;netcoreapp3.1</TargetFrameworks>

    Next item to look out for is the NuGet packages. You can specify different NuGet package version to be installed for different framework. As an example, I only have 1 NuGet package, which is Swashbuckle.AspNetCore as shown below. 

    <ItemGroup>
      <PackageReference Include="Swashbuckle.AspNetCore" Version="6.2.3" />
    </ItemGroup>

    You are required to remove it and then create 2 separate ItemGroup as shown below. By doing so, Swashbuckle.AspNetCore version 6.2.3 will be installed for net6.0, whereas version 5.6.3 will be installed for netcoreapp3.1

    <ItemGroup Condition="$(TargetFramework)=='net6.0'">
      <PackageReference Include="Swashbuckle.AspNetCore">
        <Version>6.2.3</Version>
      </PackageReference>
    </ItemGroup>
    <ItemGroup Condition="$(TargetFramework)=='netcoreapp3.1'">
      <PackageReference Include="Swashbuckle.AspNetCore">
        <Version>5.6.3</Version>
      </PackageReference>
    </ItemGroup>

    Once you saved your changes, you may notice the Background Task which locate at the bottom left of your visual studio is in progress of grabbing the NuGet packages for your project. Make sure to wait it to complete before compiling your code. Also, you will be able to see 2 different dependencies in your project under the Solution Explorer.

    Multiple dependencies

    Sunday, 13 September 2020

    Upload and Retrieve File from Azure Blob Storage in C# & VB for .NET Framework

    Azure Blob Storage is one of the Microsoft Azure Resource to store any types of file. Files that are placed in the blob storage can be accessible through API, Microsoft Azure Storage Explorer, directly from the azure portal or from PowerShell. So if you have the need to archive files or share the access to the file to different environment or application that is located in different locations, then Blob Storage is a good candidate for you. For more detail, you may further check it out from this link https://docs.microsoft.com/en-us/azure/storage/common/storage-introduction#blob-storage.

    So to get started on how to access Blob Storage from your code, firstly you need to retrieve the following packages from NuGet.

    Microsoft.Azure.ConfigurationManager
    Microsoft.Azure.KeyVault.Core
    Microsoft.Azure.Storage.Blob
    Microsoft.Azure.Storage.Common
    Newtonsoft.Json

    Once you have gotten the necessary packages, you need to define where is your blob storage located in your configuration file. But if you currently do not have an azure account, you may setup and run the Microsoft Azure Storage Emulator on your machine. Refer to this link https://docs.microsoft.com/en-us/azure/storage/common/storage-use-emulator for more information on how to set it up.

    If you are using the Microsoft Azure Storage Emulator, define the following setting in the configuration file.

    <add key="StorageConnectionString" value="UseDevelopmentStorage=true" />

    Otherwise, you need to retrieve the connection string from the Azure Portal. The format of the connection string is as follows.

    <add key="StorageConnectionString" value="DefaultEndpointsProtocol=https;AccountName=YourAzureBlobStorageName;AccountKey=YourAzureBlobStorageKey" />

    To start using the packages retrieved from NuGet. Define the CloudStorageAccount instance based on the configuration defined above. This is to specify the location of the Azure Blob Storage.

    [C#]
    CloudStorageAccount cloudStorageAccount = CloudStorageAccount.Parse(CloudConfigurationManager.GetSetting("StorageConnectionString"));

    [VB]
    Dim cloudStorageAccount As CloudStorageAccount = CloudStorageAccount.Parse(CloudConfigurationManager.GetSetting("StorageConnectionString"))

    With the CloudStorageAccount, use it to create the container. This is required before file can be placed into the Azure Blob Storage. Do take note that the container name must be lower case. For more detail about the container, you may check the following link https://docs.microsoft.com/en-us/azure/storage/blobs/storage-blobs-introduction#blob-storage-resources.

    [C#]
    CloudBlobContainer cloudBlobContainer = cloudStorageAccount.CreateCloudBlobClient().GetContainerReference("containername");

    cloudBlobContainer.CreateIfNotExists();

    [VB]
    Dim cloudBlobContainer As CloudBlobContainer = cloudStorageAccount.CreateCloudBlobClient().GetContainerReference("containername")

    cloudBlobContainer.CreateIfNotExists()

    After the creation of the container, it is now possible to upload file to the Azure Blob Storage. In the following demonstration, the file in the local machine will be used to upload.

    [C#]
    CloudBlockBlob cloudBlockBlob = cloudBlobContainer.GetBlockBlobReference("SampleFileInBlob.txt");

    cloudBlockBlob.UploadFromFile(Path.Combine(Environment.CurrentDirectory, "SampleFile.txt"));

    [VB]
    Dim cloudBlockBlob As CloudBlockBlob = cloudBlobContainer.GetBlockBlobReference("SampleFileInBlob.txt")

    cloudBlockBlob.UploadFromFile(Path.Combine(Environment.CurrentDirectory, "SampleFile.txt"))

    Alternatively, the following demonstrate on how to retrieve the file from Azure Blob Storage and save it on local machine. 

    [C#]
    CloudBlockBlob cloudBlockBlob = cloudBlobContainer.GetBlockBlobReference("SampleFileInBlob.txt");

    cloudBlockBlob.DownloadToFile(Path.Combine(Environment.CurrentDirectory, "SavedSampleFile.txt"), FileMode.Create);

    [VB]
    Dim cloudBlockBlob As CloudBlockBlob = cloudBlobContainer.GetBlockBlobReference("SampleFileInBlob.txt")

    cloudBlockBlob.DownloadToFile(Path.Combine(Environment.CurrentDirectory, "SavedSampleFile.txt"), FileMode.Create)

    Check out the sample code here https://1drv.ms/u/s!Aj2AA7hoIWHm03MBsAUCRtvATCYe.

    Friday, 7 April 2017

    [Web Farm][Network Load Balancing] Unable to Serialize the Session State C# & VB

    Do you faced a situation where you are required to host the same ASP.NET web application to multiple servers (Web Farm) to divide traffic into different servers due to high amount of traffic? Due to this, you configured the <sessionStateto use SQLServer in your web configuration file. While you are performing verification on your application, somehow you stumble upon an error as shown on the following image.


    Based on the error "Unable to serialize the session state. In 'StateServer' and 'SQLServer' mode, ASP.NET will serialize the session state objects, and as a result non-serializable object or MarshalByRef objects are not permitted. The same restriction applies if similar serialization is done by the custom session state store in 'Custom' mode.", it basically means that when the <sessionState> is configured to use SQLServer, make sure that any object used to assign into Session must be decorated with serializable attribute.

    Further read on the error, the key sentence "Type 'WebNLB.TestClass' in Assembly 'WebNLB, Version=1.0.0.0, Culture=neutral, PublicKeyToken=null' is not marked as serializable.]". This tells you that you have a class name called TestClass and it doesn't have the attribute serializable. So add the serializable attribute to the TestClass.

    [C#]
    [Serializable]
    public class TestClass
    {

    }

    [VB]
    <Serializable> Public Class TestClass

    End Class

    Do the same to your application. Make sure to add serializable attribute to all the classes that are used to assign into Session. Once you are done, redeploy your application to each of the servers and re-verify your application. You will notice that your application will no longer hit the error again.

    Sunday, 26 March 2017

    What is Race Condition C# & VB

    You might be wondering what is race condition or do you even need to care of what it does to your application? Well yes, you do in fact need to know what it is as it may lead to your application not performing what you intended it to be.

    A race condition is a situation where 2 or more processes / threads is accessing the same resource at the same time, in which lead to undesired result to occur.

    Let's use the following code to illustrate how race condition occurred. Assume that you want to increase the _value by 1 each time the IncreaseValue() is called.

    [C#]
    private static int _value = 0;

    private static int GetValue()
    {
        return _value;
    }

    private static int SetValue(int value)
    {
        value += 1;
        return value;
    }

    public void IncreaseValue()
    {
        var value = GetValue();
        _value = SetValue(value);
    }

    [VB]
    Private Shared _value As Integer = 0

    Private Function GetValue() As Integer
        Return _value
    End Function

    Private Function SetValue(ByVal value As Integer) As Integer
        value = value + 1
        Return value
    End Function

    Public Sub IncreaseValue()
        Dim value As Integer = GetValue()
        _value = SetValue(value)
    End Sub

    The following table shows how the code execute if you are running the above code in a single thread environment. In this case, race condition will not occur.

    Step
    Thread 1
    Value in _value
    1
    Call IncreaseValue() method
    0
    2
    Call GetValue() and value obtained is 0
    0
    3
    Call SetValue() and value obtained is 1 and assign 1 to _value
    1
    4
    Exit IncreaseValue() method.
    1
    5
    Call IncreaseValue() method.
    1
    6
    Call GetValue() and value obtained is 1
    1
    7
    Call SetValue() and value obtained is 2 and assign 2 to _value
    2
    8
    Exit IncreaseValue() method.
    2

    But imagine that there are more than 1 threads accessing the static variable _value at the same time.

    Step
    Thread 1
    Step
    Thread 2
    Value in _value
    1
    Call IncreraseValue() method
    2
    Call IncreaseValue() method
    0
    3
    Call GetValue() and value obtained is 0
    4
    Call GetValue() and value obtained is 0
    0
    5
    Call SetValue() and value obtained is 1 and assign 1 to _value
    6
    Call SetValue() and value obtained is 1 and assign 1 to _value
    1
    7
    Exit IncreaseValue() method
    8
    Exit IncreaseValue() method
    1

    The final result supposed to be 2, but due to the original value obtained by both of the thread is 0, both of them will end up having the same final value of 1 and assign it back to _value. So this is how race condition occurred.

    To handle the race condition, you can rely on any one of the synchronization primitives as shown here https://msdn.microsoft.com/en-us/library/ms228964(v=vs.110).aspx.

    You may refer to my previous blog posts on how to use each of the synchronization primitives.
    Mutex: http://jaryl-lan.blogspot.com/2015/08/thread-synchronization-with-mutex.html
    SpinLock: http://jaryl-lan.blogspot.com/2015/08/thread-synchronization-with-spinlock.html
    Semaphore: http://jaryl-lan.blogspot.com/2015/11/thread-synchronization-with-semaphore.html

    For this example, we will use lock keyword.

    [C#]
    private static int _value = 0;
    private object _lock = new object();

    private static int GetValue()
    {
        return _value;
    }

    private static int SetValue(int value)
    {
        value += 1;
        return value;
    }

    public void IncreaseValue()
    {
        lock (_lock)
        {
            var value = GetValue();
            _value = SetValue(value);
        }
    }

    [VB]
    Private Shared _value As Integer = 0
    Private _lock As Object = New Object()

    Private Function GetValue() As Integer
        Return _value
    End Function

    Private Function SetValue(ByVal value As Integer) As Integer
        value = value + 1
        Return value
    End Function

    Public Sub IncreaseValue()
        SyncLock _lock
            Dim value As Integer = GetValue()
            _value = SetValue(value)
        End SyncLock
    End Sub

    At any one time, only 1 thread can access the code in lock statement. So the subsequent threads have to wait for the current thread in the lock statement to complete its execution and exit from lock statement block. Thus, race condition did not occur. The following table shows how the code executes with lock keyword.

    Step
    Thread 1
    Step
    Thread 2
    Value in _value
    1
    Call IncreraseValue() method
    2
    Call IncreaseValue() method
    0
    3
    Execute lock keyword
    4
    Execute lock keyword.
    0
    5
    Call GetValue() and value obtained is 0


    0
    6
    Call SetValue() and value obtained is 1 and assign 1 to _value


    1
    7
    Exit from lock statement
    8
    Call GetValue() and value obtained is 1
    1
    9
    Exit IncreaseValue() method
    10
    Call SetValue() and value obtained is 2 and assign 2 to _value
    2


    11
    Exit from lock statement
    2


    12
    Exit IncreaseValue() method
    2

    It is not a must to use synchronization primitives to handle race condition. There are many other ways to handle race condition based on different kind of situations or scenarios.

    So for example if you want to assign a value to a variable or instantiate an object and assign it to a variable if it is null, you can rely on lazy loading or static initialization.

    If is SQL Server related, you can rely on one of the following.
    Hints: https://docs.microsoft.com/en-us/sql/t-sql/queries/hints-transact-sql-table
    sp_getapplock: https://docs.microsoft.com/en-us/sql/relational-databases/system-stored-procedures/sp-getapplock-transact-sql
    sp_releaseapplock: https://docs.microsoft.com/en-us/sql/relational-databases/system-stored-procedures/sp-releaseapplock-transact-sql

    You may also be in a situation where you just need to revise your application design without relying on the above listed technologies to handle race condition.