Sunday 27 February 2022

Write to Physical File with Serilog in .NET Core

It is common for a need to log application errors or including trace log for ease of troubleshooting issues that may arise. By default, the .NET itself already provided a few classes (For example: FileStream, TextWriter, etc) that allows you to write content into file. But what if you want to include logs that are written by the .NET itself, or customize the .NET log content, or write the same content to many different destination (eg: File, ElasticSearch, BlogStorage, etc). Then Serilog can help you with it.

For the prerequisites, it is required to NuGet the following 2 packages

  • Serilog.AspNetCore
  • Serilog.Sinks.File

Next, head to Program.cs file. You will need to call to the extension method UseSerilog() to start using Serilog.

Method 1: Configure Serilog in code.

[.NET 6] - Minimal hosting model
builder.Host.UseSerilog((hostBuilderContext, loggerConfiguration) =>
    loggerConfiguration
        .WriteTo.Console()
        .WriteTo.File("logs/log.txt", rollingInterval: RollingInterval.Day));

[.NET 5 and earlier]
Host.CreateDefaultBuilder(args)
    .UseSerilog((hostBuilderContext, loggerConfiguration) =>
        loggerConfiguration
            .WriteTo.Console()
            .WriteTo.File("logs/log.txt", rollingInterval: RollingInterval.Day))

Method 2: Configure Serilog from appSettings file.

[appSettings.json]
"Serilog": {
  "WriteTo": [
    {
      "Name": "Console"
    },
    {
      "Name": "File",
      "Args": {
        "path": "logs/log.txt",
        "rollingInterval": "Day"
      }
    }
  ]
}

[.NET 6] - Minimal hosting model
builder.Host.UseSerilog((hostBuilderContext, loggerConfiguration) =>
    loggerConfiguration
        .ReadFrom.Configuration(hostBuilderContext.Configuration));

[.NET 5 and earlier]
Host.CreateDefaultBuilder(args)
    .UseSerilog((hostBuilderContext, loggerConfiguration) =>
        loggerConfiguration
            .ReadFrom.Configuration(hostBuilderContext.Configuration))

What the above code snippet does is to write the same log content into console and log file. 

Write to console

Write to file

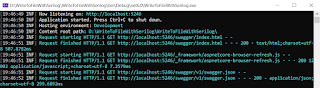
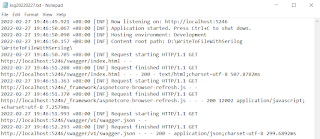
Based on the specified path value, the file format will be log{yyyyMMdd}.txt (example: log20220227.txt). And since the configuration mentioned the rolling interval is Day, everyday a new file will be created whenever there are new content to be logged. For more details on what can be further customized for the file, you can head over to https://github.com/serilog/serilog-sinks-file.

You may be wondering what is the difference of the above code snippet compared to creating a new instance of logger with CreateLogger(). First would be to include .NET logs into the file. Second, you will be able to rely on the Microsoft logging library (Microsoft.Extensions.Logging) and inject the instance of ILogger to any of your class through the constructor. Any logs written through the ILogger will be written into your file as well as the console output.

Sample Code: https://1drv.ms/u/s!Aj2AA7hoIWHm1G4BIALQnYew9KFY?e=bIa0tq


Saturday 26 February 2022

Multi Target Framework for .NET Core Application

It is possible to target multiple framework for .NET Core application. But it have some limitations. For example, if the project target netcoreapp3.1 and net6.0, features that are available on net6.0 will not longer be supported. Due to this, it is rarely to do so unless you got hit with situation where you want to upgrade to newest .NET version but due to certain servers yet to installed the latest .NET core runtime.

First and foremost, make sure you have the targeted framework installed. Otherwise you get hit with an error while compiling your code. For example, if you are targeting netcoreapp3.1 and net6.0, make sure both of them is installed on your machine.

To get started, open up your project by double clicking on it and look for TargetFramework. Rename it to TargetFrameworks and specify net6.0;netcoreapp3.1

<TargetFrameworks>net6.0;netcoreapp3.1</TargetFrameworks>

Next item to look out for is the NuGet packages. You can specify different NuGet package version to be installed for different framework. As an example, I only have 1 NuGet package, which is Swashbuckle.AspNetCore as shown below. 

<ItemGroup>
  <PackageReference Include="Swashbuckle.AspNetCore" Version="6.2.3" />
</ItemGroup>

You are required to remove it and then create 2 separate ItemGroup as shown below. By doing so, Swashbuckle.AspNetCore version 6.2.3 will be installed for net6.0, whereas version 5.6.3 will be installed for netcoreapp3.1

<ItemGroup Condition="$(TargetFramework)=='net6.0'">
  <PackageReference Include="Swashbuckle.AspNetCore">
    <Version>6.2.3</Version>
  </PackageReference>
</ItemGroup>
<ItemGroup Condition="$(TargetFramework)=='netcoreapp3.1'">
  <PackageReference Include="Swashbuckle.AspNetCore">
    <Version>5.6.3</Version>
  </PackageReference>
</ItemGroup>

Once you saved your changes, you may notice the Background Task which locate at the bottom left of your visual studio is in progress of grabbing the NuGet packages for your project. Make sure to wait it to complete before compiling your code. Also, you will be able to see 2 different dependencies in your project under the Solution Explorer.

Multiple dependencies