Before you can start writing a unit test method, you need to have a few functional methods. So as an example, we will write one simple dummy method. This method will treat the user "John" as an existing customer.
[C#]
public bool VerifyUser(string name)
{
return name == "John";
}
Public Function VerifyUser(ByVal name As String) As Boolean
Return name = "John"
End Function
Once you have a testable methods, create a "unit test project" and add a new "test class" to your unit test project. You are required to add reference of the project that contain the testable methods.
Steps to create a unit test project:
1) On the Solution Explorer in your visual studio, right click on your solution, hover to "Add" and click "New Project...". A window named "Add New Project" will be prompted.
 |
| Add new Project |
3) On the middle pane, click "Unit Test Project".
4) Fill in your desired name and location. Once you are done. Click "OK" button.
 |
| Add a new Unit Test Project |
 |
| Add new Item |
7) On the middle pane, click "Unit Test".
8) Fill in your desired name and click "Add" button.
 |
| Add a new Unit Test Class |
 |
| Add Reference |
11) On the middle pane, tick the project that contain the testable methods and click "OK" button.
 |
| Select the desired reference to be added |
Assuming you want to test whether the user "John" is exist by executing the method named VerifyUser. So create a method and decorate it with "TestMethod" attribute. From this method, invoke the method VerifyUser and pass in the string value "John" as parameter value. Obtain the result from the method and verify it with Assert. The Assert.AreEqual is used to verify whether the result returned from VerifyUser matches the expected result. In this case, the expected result is true.
[C#]
[TestMethod]
public void IsJohnExistTest()
{
var component = new RedemptionComponent();
var result = component.VerifyUser("John");
Assert.AreEqual(true, result,
"User 'John' does not
exist.");
}
[VB]
<TestMethod()>
Public Sub IsJohnExistTest()
Dim component As RedemptionComponent = New RedemptionComponent()
Dim result As User = component.VerifyUser("John")
Assert.AreEqual(true, result,
"User 'John' does not
exist.")
End Sub
To run your test method, there are two ways.
[Option 1]
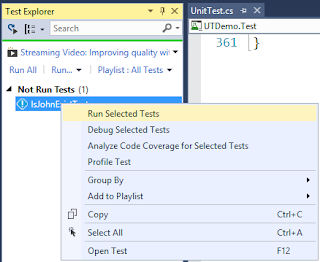
1) At the top menu in Visual Studio, click Test, hover to Windows and click Test Explorer. "Test Explorer" window will be shown in visual studio.
 |
| Open Test Explorer window |
 |
| Run Selected Tests |
[Option 2]
1) In your class file, locate the desired test method that you want to test.
2) Left click on the method and on keyboard, press CTRL+R and T. To debug the method, press "CTRL+R and CTRL+T".
Once the test method execution is completed, you will either see
1) A green tick icon if the test is successful, or
 |
| Successful Test |
 |
| Failed Test |
Refer to the following for the sample project.
C#: https://1drv.ms/u/s!Aj2AA7hoIWHmgm-KRQQBuL3ZCCf7
VB: https://1drv.ms/u/s!Aj2AA7hoIWHmgm44Muju_EO1tGl9

No comments:
Post a Comment