Continuation from the previous post https://jaryl-lan.blogspot.com/2022/02/write-to-physical-file-with-serilog-in.html which talks about writing to physical file through Serilog. For this round will be to write logs to Elasticsearch with Serilog.
First and foremost, you need to have Elasticsearch up and running. So if you do not have it, you will have to install it on your local machine. Otherwise ignore the installation steps. There are few ways to go about it but I will go through using docker command with minimal steps.
There are 2 images required. Elasticsearch and Kibana. Kibana is required for you to view the logs.
1. Run these commands to grab the Elasticsearch and Kibana image
docker pull docker.elastic.co/elasticsearch/elasticsearch:8.0.1
docker pull docker.elastic.co/kibana/kibana:8.0.1
2. Run this command to create a network. To be used by Elasticsearch and Kibana late
docker network create elasticsearch3. Run this command to start the Elasticsearch
docker run --rm --name localelasticsearch --net elasticsearch -p 9200:9200 -p 9300:9300 -t docker.elastic.co/elasticsearch/elasticsearch:8.0.1Note: If the Elasticsearch stopped on its own, most likely it is due to error. If it shows the following error, you are then required to increase the max virtual memory.
bootstrap check failure [1] of [1]: max virtual memory areas vm.max_map_count [65530] is too low, increase to at least [262144]
The command to set the maximum virtual memory is heavily depend on where the docker is installed. In my case the docker is on the wsl. So if is different, you may refer from this link to identify which command is suitable https://www.elastic.co/guide/en/elasticsearch/reference/current/docker.html#_set_vm_max_map_count_to_at_least_262144.
So for wsl, firstly terminal into the wsl with the following command.
wsl -d docker-desktopOptional: you can use this command to check what is the current max virtual memory value. In my case it is showing 65530.
cat /proc/sys/vm/max_map_countRun the following command to set the max virtual memory value to 262144
sysctl -w vm.max_map_count=262144Once done, type exit and hit enter key to exit from the wsl terminal.
exitRun this command again to verify that the Elasticsearch did not terminate on its own.
docker run --rm --name localelasticsearch --net elasticsearch -p 9200:9200 -p 9300:9300 -t docker.elastic.co/elasticsearch/elasticsearch:8.0.14. Run this command to start the kibana.
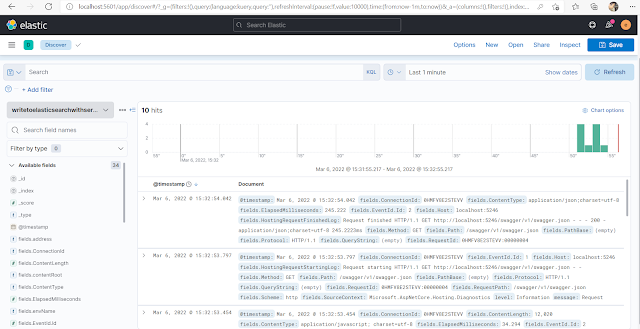
docker run --rm --name localkibana --net elasticsearch -p 5601:5601 docker.elastic.co/kibana/kibana:8.0.15. Open up your browser and browse to http://localhost:5601. It may asked you for a token. the token can be obtained from the console output that you run on step 3. The token should display below the following text
7. Finally, it will asked you to fill up the login credentials. The username is elastic, whereas the password is printed on the console output that runs the elasticsearch in step 3.

With the environment ready to use. Let's get back to the code.
The NuGet packages requires are as follows
- Serilog.AspNetCore
- Serilog.Sinks.Elasticsearch
Note 2: As of this writing, the Serilog.Sinks.Elasticsearch is having issue writing to Elasticsearch version 8. You will get hit with the following error due to the deprecation of type parameter.
loggerConfiguration
.WriteTo.Console()
.WriteTo.Elasticsearch(new ElasticsearchSinkOptions(new Uri("https://yourusername:yourpassword@localhost:9200"))
TypeName = null,
loggerConfiguration
.WriteTo.Console()
.WriteTo.Elasticsearch(new ElasticsearchSinkOptions(new Uri("https://yourusername:yourpassword@localhost:9200"))
TypeName = null,
SelfLog.Enable(Console.Error);
})
The reason of adding the SelfLog.Enable(Console.Error); is to print out any errors that happens when writing logs to Elasticsearch. Which helps in troubleshooting. Also you may consider changing it to write into physical file or any other storage.
If you not able to log to Elasticsearch and received the following error:
Call: Status code unknown from: POST /_bulk
---> System.Net.Http.HttpRequestException: The SSL connection could not be established, see inner exception.
---> System.Security.Authentication.AuthenticationException: The remote certificate is invalid because of errors in the certificate chain: UntrustedRoot
It means that you do not have the cert used by the Elasticsearch since Elasticsearch create its own cert (Self-Signed Certificate) when it launched the first time. There are ways to modify your code to forcefully ignore certificate error. In this case we are not going into that route. But instead add the certificate into the "Trusted Root Certification Authorities" store.
Before we can add it to the certificate store, we need to grab the certificate generated by the Elasticsearch. In the official link https://www.elastic.co/guide/en/elasticsearch/reference/current/docker.html#elasticsearch-security-certificates. it specified /usr/share/elasticsearch/config/certs, which is the path of the certificate generated in the Elasticsearch container and we need the file http_ca.crt. To grab it out to your physical folder, run the following command.
Command argument to copy file from container to physical folder:
docker cp <Elasticsearch container name>:<file path in container> <Physical file path>docker cp localelasticsearch:/usr/share/elasticsearch/config/certs/http_ca.crt C:/http_ca.crtOnce the file has been copied out. Locate the certificate file and run it.
1. Click Install Certificate... button.


6. If it prompt a Security Warning window, click Yes button.
Once the certificate has been added to the certificate store. Rerun your application and the error will no longer appear.
If you need to rely on configuration file instead of code to configure, probably advisable to use version 7 instead due to the library yet to properly support version 8 of Elasticsearch. Do follow up from their github issue https://github.com/serilog-contrib/serilog-sinks-elasticsearch/issues.
Sample Code: https://1drv.ms/u/s!Aj2AA7hoIWHm1HCLWNJsI6ZrS1Sb?e=TnyW0T

Your example is very helpful, thanks very much
ReplyDeleteGreat blog post!
ReplyDeleteYou are a life saver. Was hitting my head against the wall since morning.
ReplyDelete